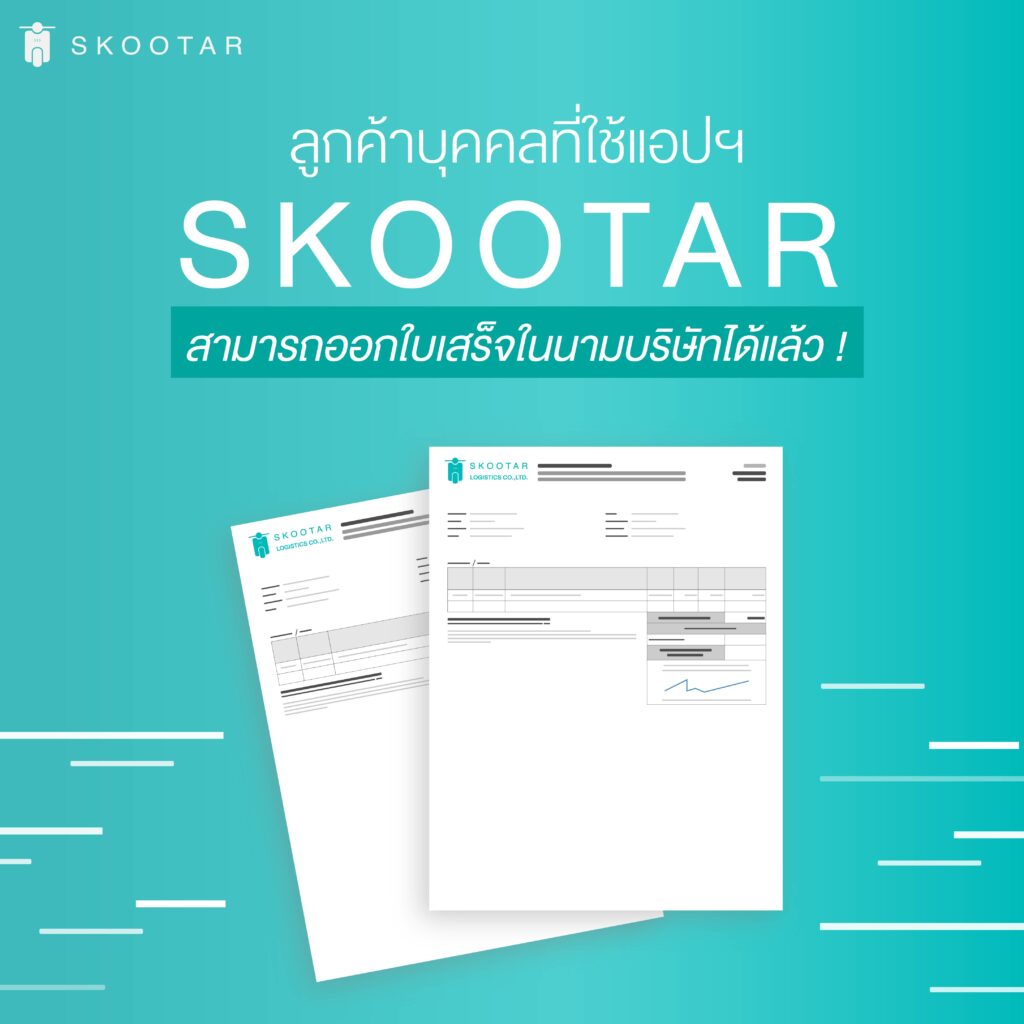
SKOOTAR Individual Customers Can Now Issue Receipts Under a Company Name
In November 18, SKOOTAR has brought a new feature for individual customers to be able to issue their receipts under their respective company name. With this feature, the individual customers can then withdraw money in a case when a certain company does not have a company customer in our system. At that time, the individual customers can do it through making an order on the website only. You can read for more information about how to issue a receipt under a company name through the website here.
SKOOTAR Individual Customers Can Issue Receipt Under a Company Name As Follows.
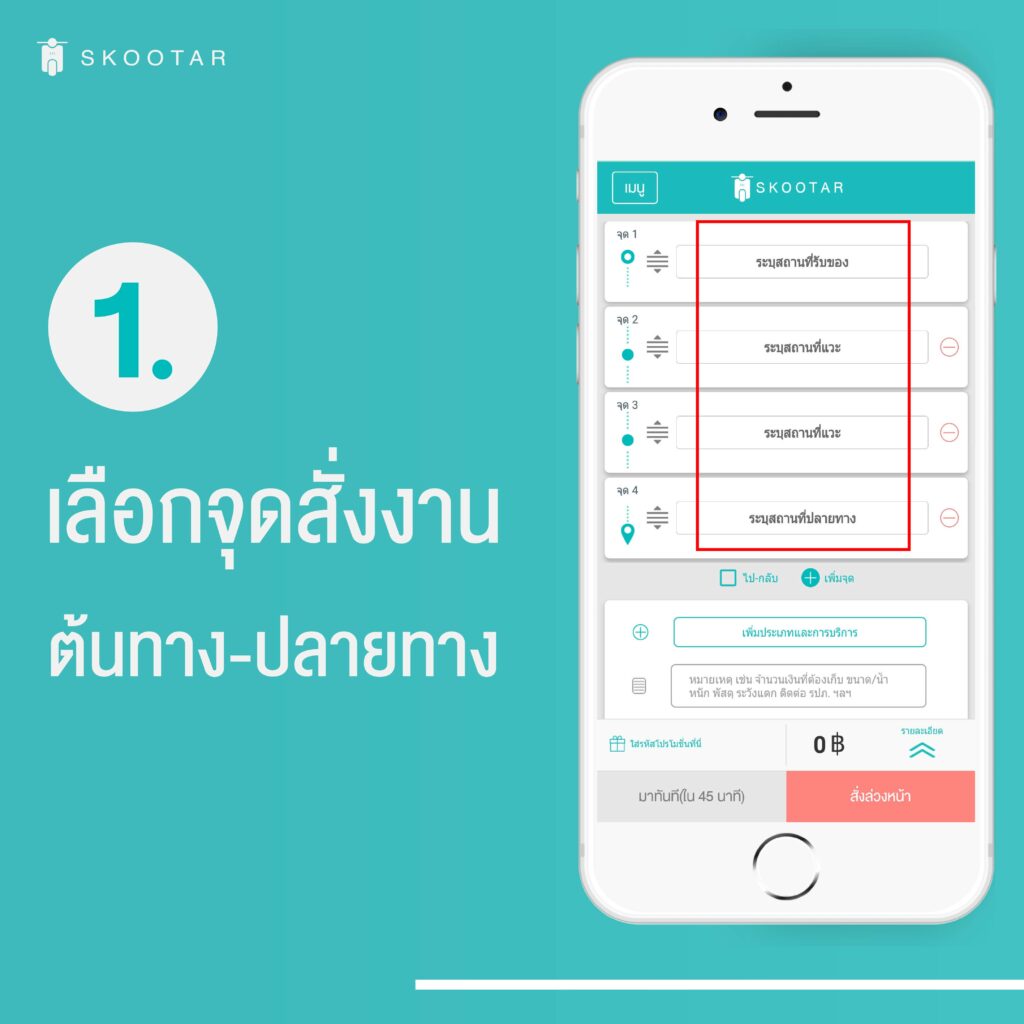
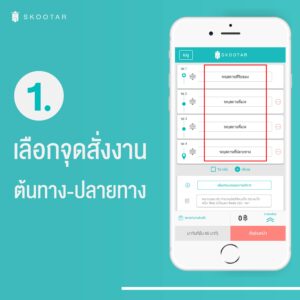
1. Select Your Order Location Starting Point – Ending Point
1. Open SKOOTAR app, then choose your preferred location from starting point to ending point (up to 10 locations). You can have a messenger to go back to the starting point by selecting ‘Round Trip’.
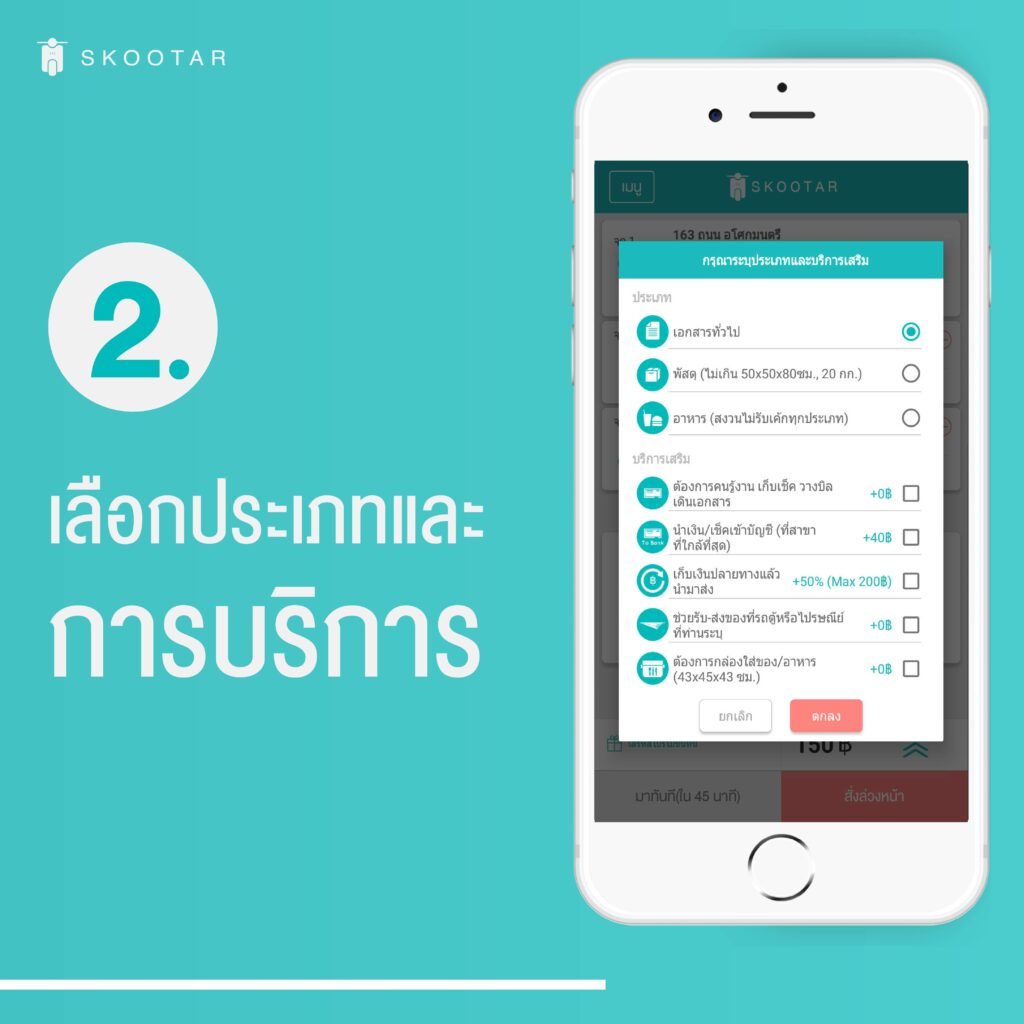
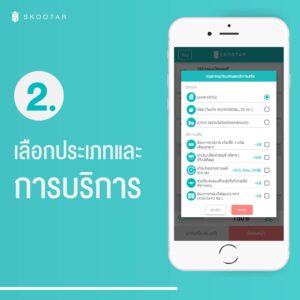
2. Select a Preferred Category and Service
2. Select your preferred category and service. You can add more detail in a note box regarding things you would like your messenger to know.
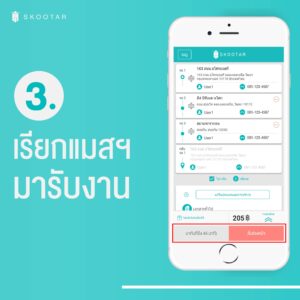
3. Call a Messenger
3. Enter a promo code (if any) and click ‘Now’ (in 45 minutes) in order to call a messenger to pick up your package right away or click ‘Later’ in order to book an order in advance.
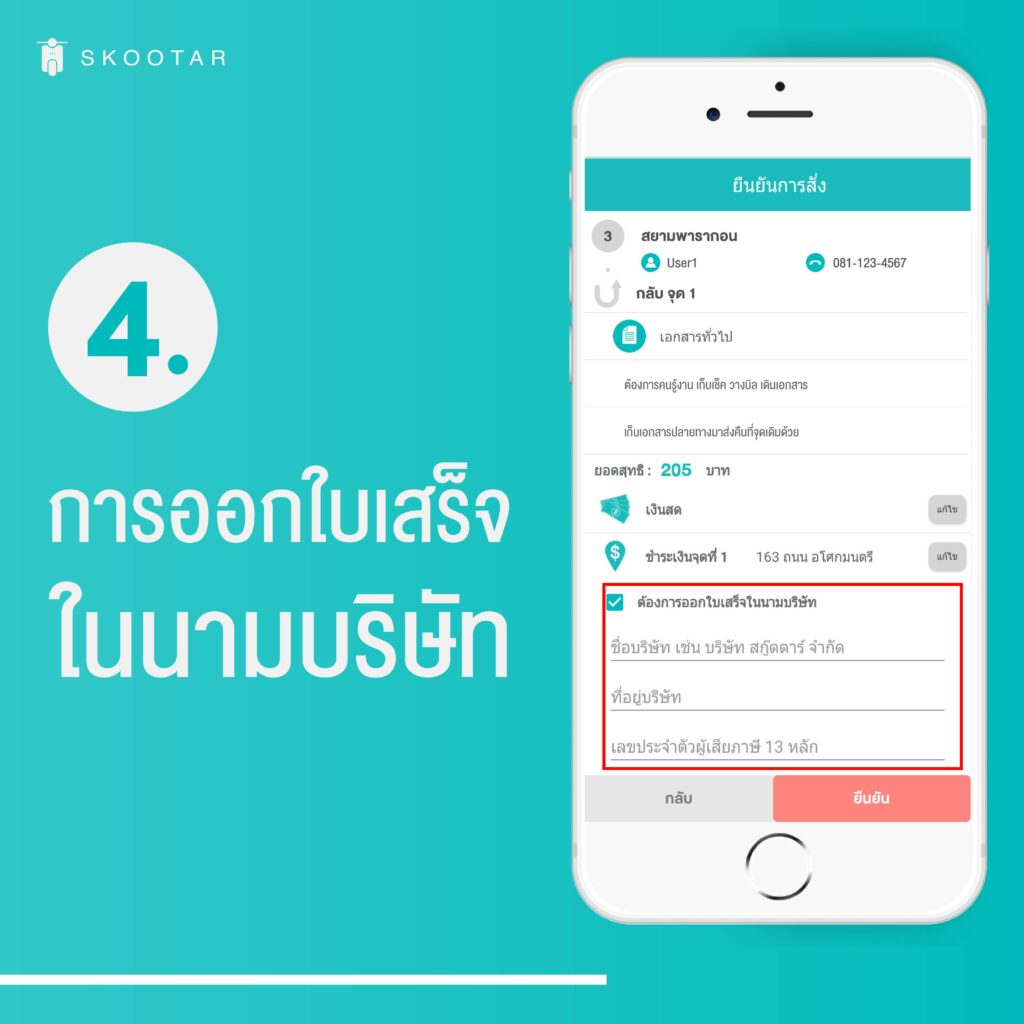
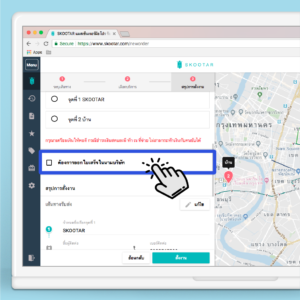
4. Issue a Receipt Under a Company Name
4. On the screen of confirming an order, make sure all of the information is correct. After that, click ‘Issue a Receipt Under a Company Name’, and then fill out all of the detail to confirm.
**For customers who make payment by cash, credit card or PromptPay only.
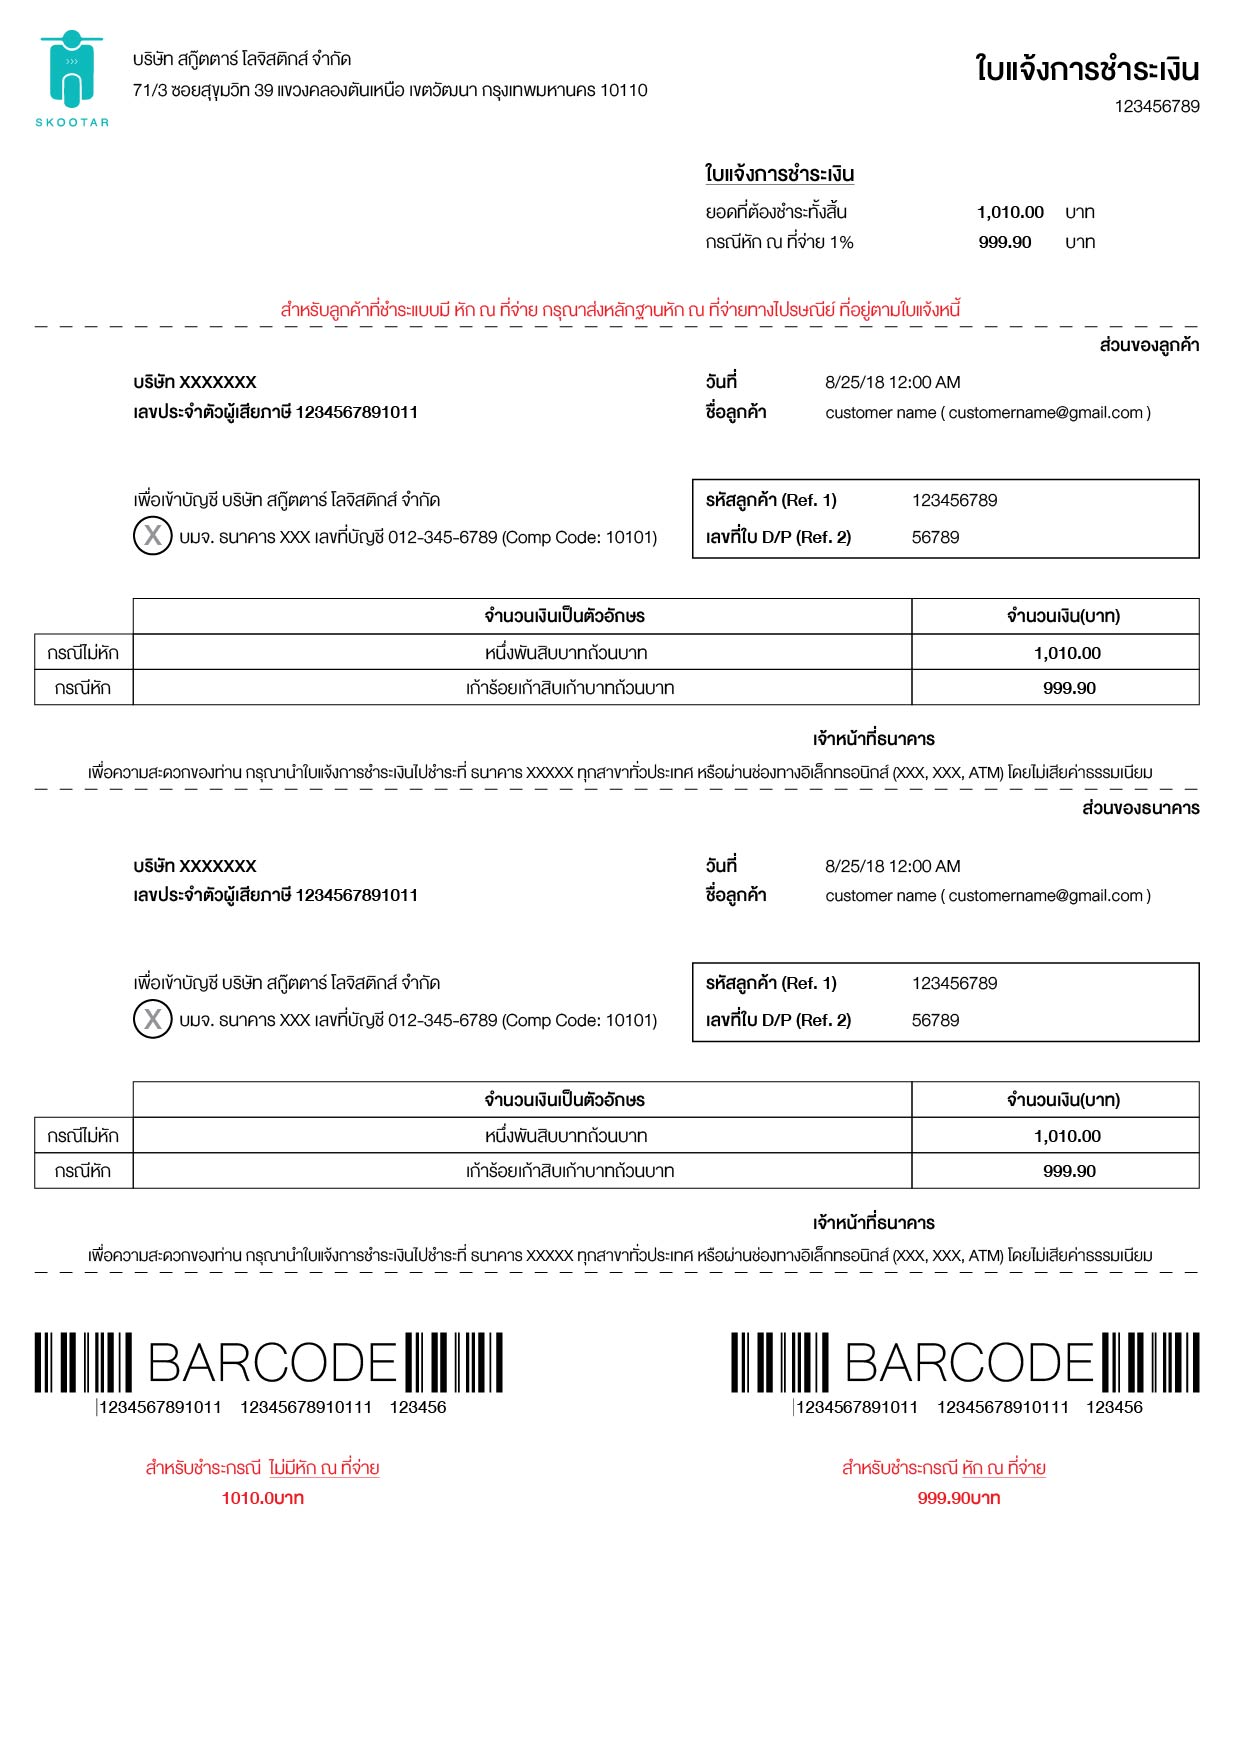
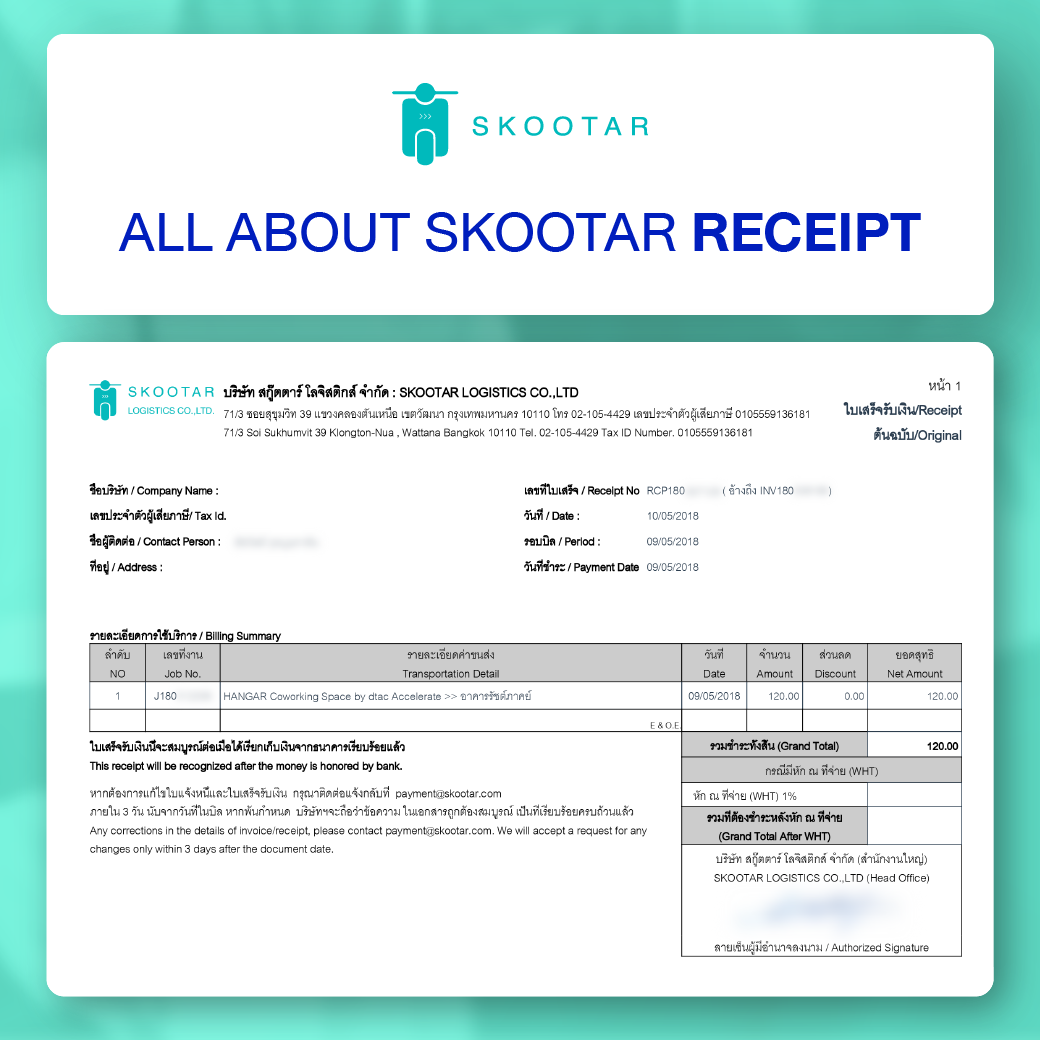
Bill payment, a new feature from SKOOTAR specifically for business customers that will help you make your payment easier without disclosing proof anymore. The feature will start functioning the first bill payment in February 2019 onward. You will receive another invoice along with a bar code that will help you make your payment easily via these channels as follows.
1. Every branch of Kasikorn Bank – You can make your transaction at a physical branch or via electronic channels without paying any fees. You can do it by following the simple steps as shown below.
K-Plus
Bill payment via K-Plus steps
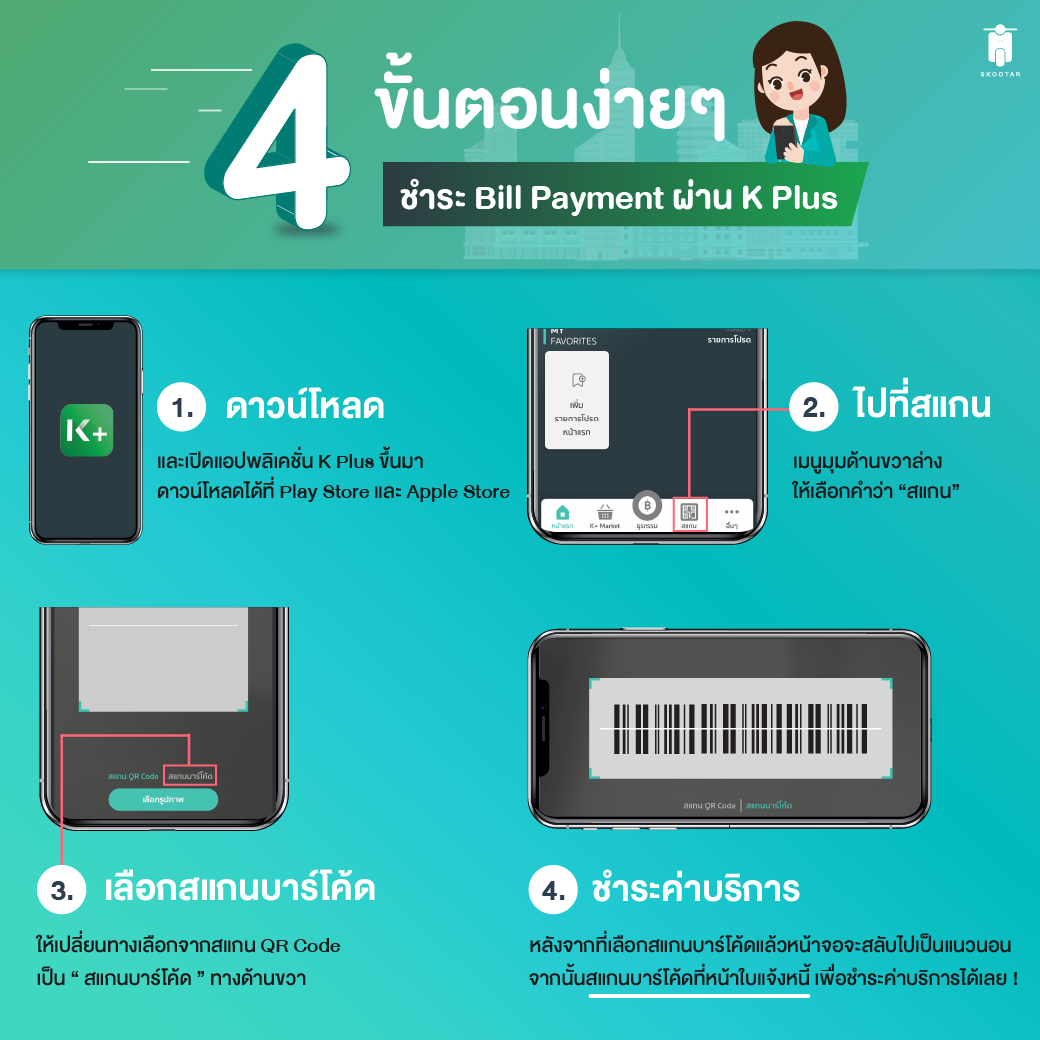
4 Simple Steps To Make Payment via K-Plus
1. Download – Open K-Plus app or download it on Play Store or Apple Store.
2. Go to Scan – On the right hand side below ‘Scan’.
3. Scan Bar Code – Select ‘Scan Bar Code’ instead of ‘QR Code’ on the right hand side.
4. Make Payment – After clicking the ‘Scan Bar Code’, the screen will turn horizontal. Now you scan the bar code on the invoice page in order to make your payment.
K-Cyber – To create a bill payment form. Click here for more info
Bill payment via K Cyber steps
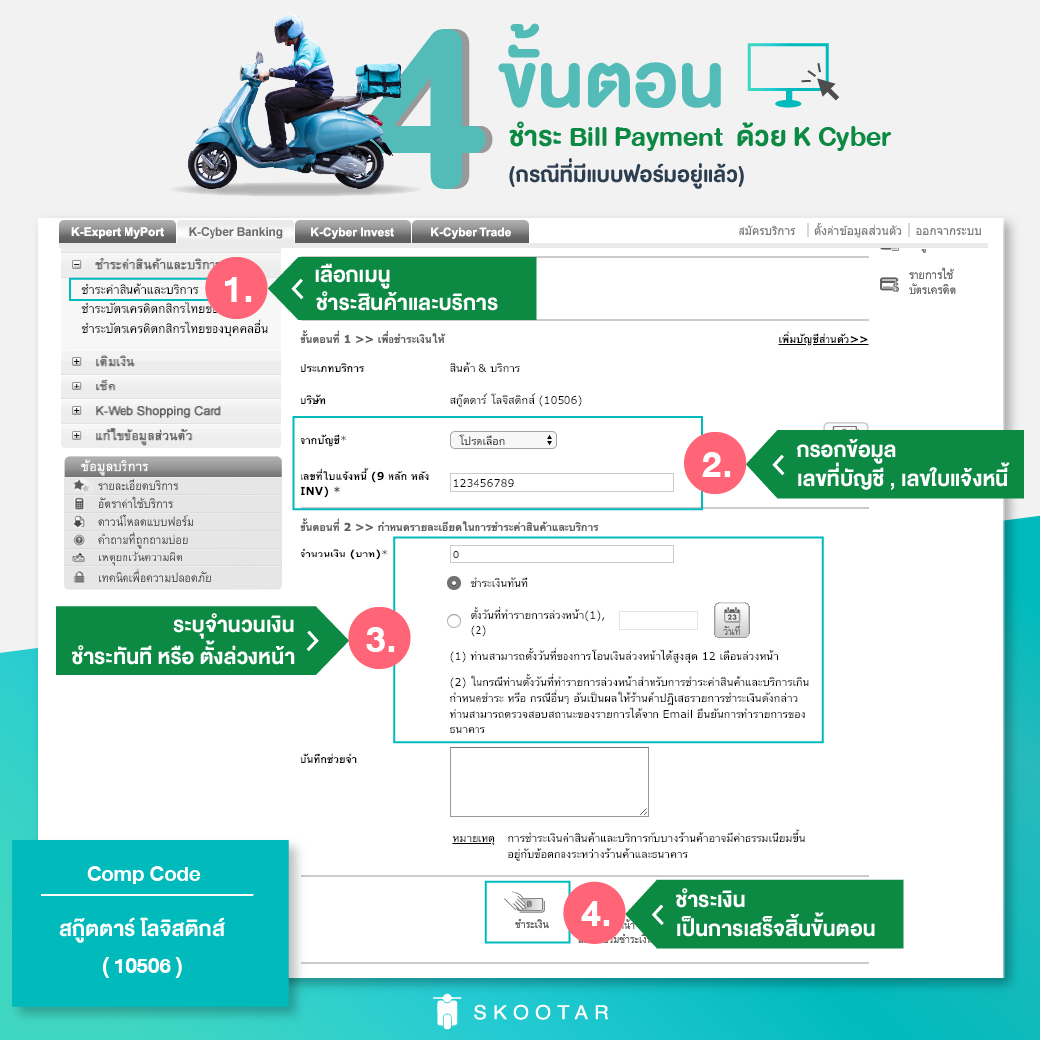
1. Click ‘Product and Service Payment’
2. Fill out detail such as bank account number and invoice
3. Specify the amount of money you would like to pay now or later
4. Make payment
ATM
Bill payment example
1. Insert your ATM card.
2. Enter you ATM card password.
3. Click ‘Bill Payment/Cash Payment/Barcode Payment’.
4. Click ‘Others/Specify Company Code/Specify Company ID’.
5. Click ‘Saving Account’.
6. Enter password Company ID ‘10506’ Skootar Logistics.
7. Enter your invoice number (Ref.1) according to your bill payment.
8. Enter your customer code (Ref.2) according to your bill payment.
9. Enter the amount of money you would like to transfer.
10. Check for accuracy before clicking ‘Confirm’
Any branch near you
2. Via other banks, click here for more information.
If you need additional information, feel free to contact our call center 02 105 4429 during business hours.
New Feature, Bill Payment! To Make Your Payment via Banks
New Feature, Bill Payment! To Make Your Payment via Banks
Good news! In order to provide more convenience to our lovely customers, the company customers who choose payment method with invoice will receive an extra document, which is ‘Bill Payment’. This will be effective from February 2019 onward. The good thing about this new feature of payment is; the customers do not have to make payment directly with SKOOTAR anymore. However, transferring money method is still effective, but the customers have to notify their payment to SKOOTAR every time.
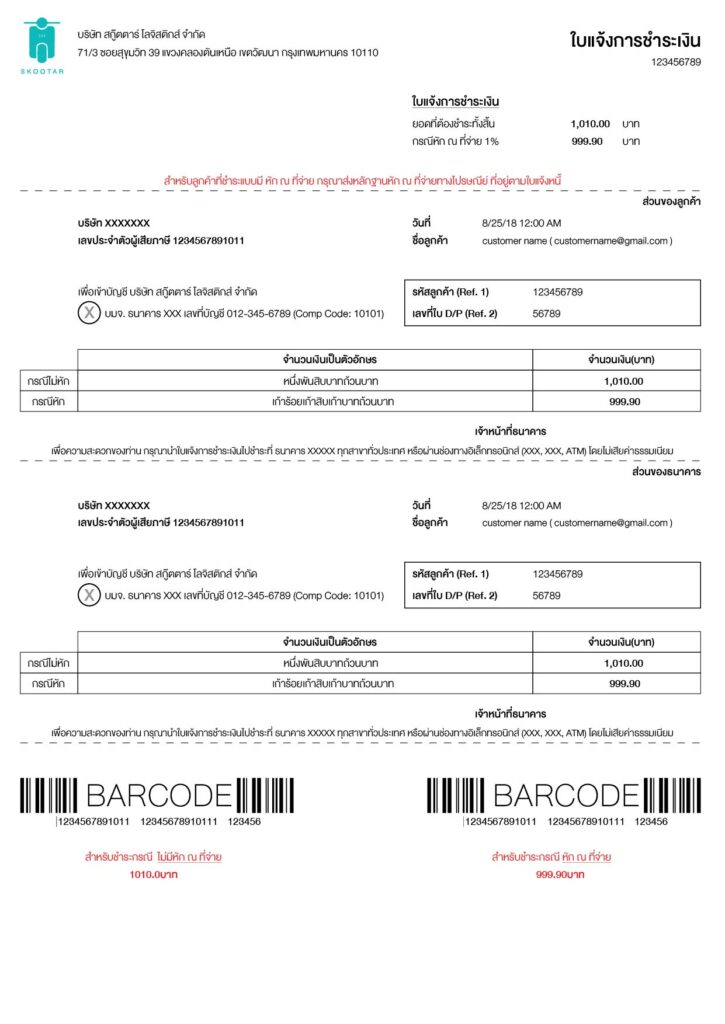
The document will notify the amount you have to pay along with a bar code. You can make the payment through various simple channels as follows.
1. Via various electronic channels of Kasikorn Bank such as ATM/K-Plus/K-Cyber/K-Biznet/K-Cash Connect without any fees. Click here.
2. Every branch of Kasikorn Bank without any fees charged.
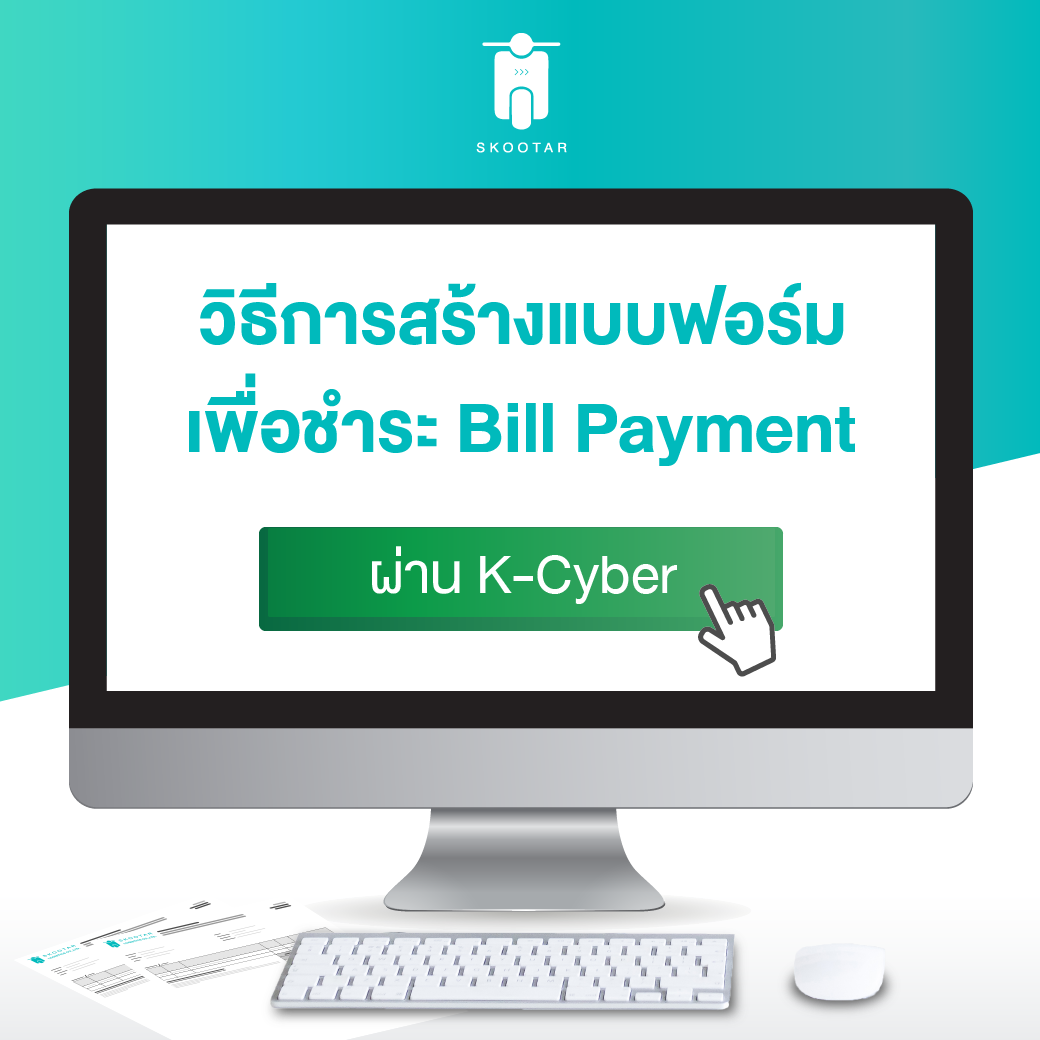
How to Create a Form in Order to Make a Bill Payment Via K-Cyber
How to Create a Bill Payment Form via K-Cyber Specifically for a Business Customer
We have launched the feature, Bill Payment for company users that will help making payment transaction more convenient and can be done at any place and at any time. (Click here for more info)
Many of you may not know, yet, that the bill payment can create a form that can remember your data, which helps making your next transaction more convenient. The instruction of how to make the payment via K-Cyber is as follows.
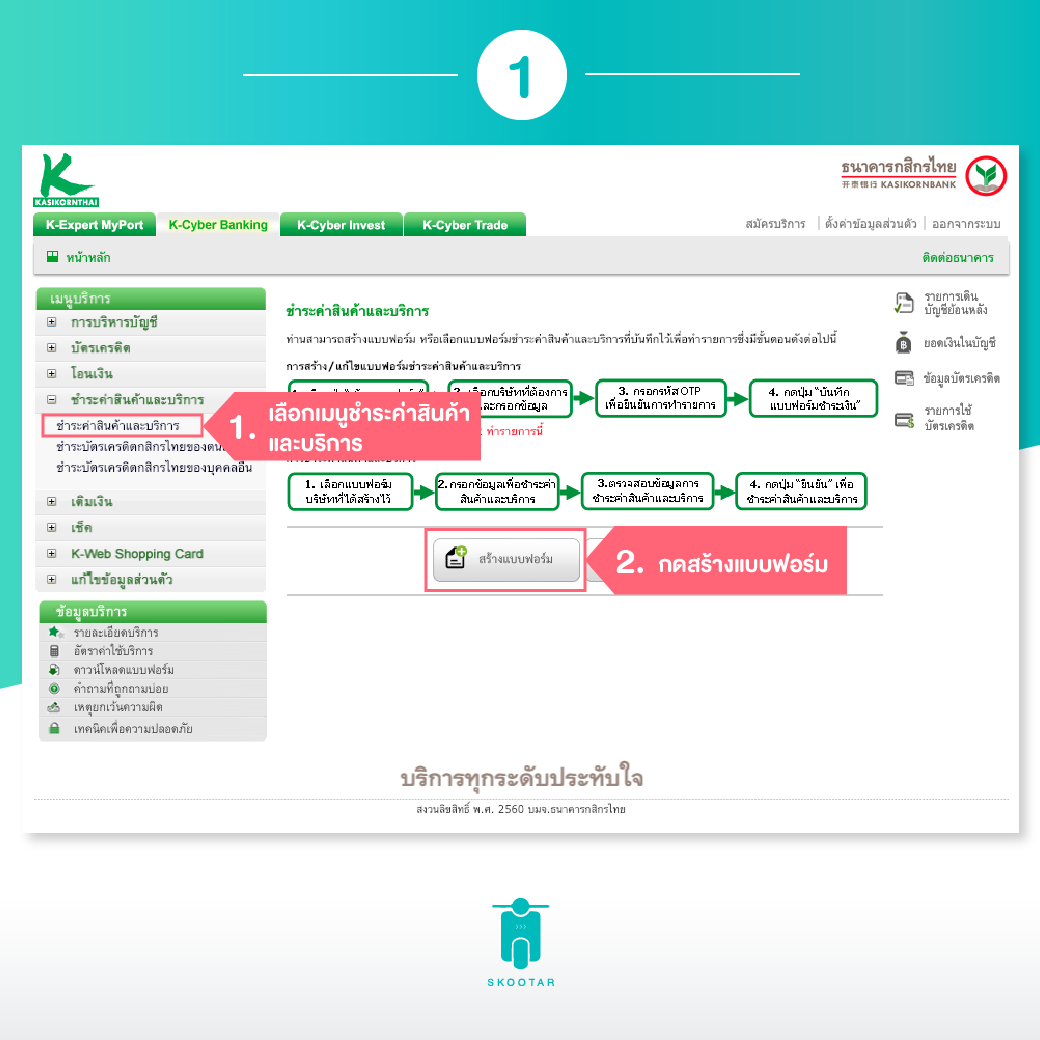
1. Sign in to the system of K-Cyber Banking. Select the left menu ‘Product & Service Payment’.
Sign in to the system of K-Cyber Banking
1. Select Menu ‘Product & Service Payment’
2. Click new billing template
2. Product and service payment page. Select ‘New Billing Template’ button in order to access the page of product and service payment.
3. Bill payment form page. Create a form’s name > Select types of service for making payment ‘Products and Services’ > Select a Company you wish to make payment to. Click ‘Skootar Logistics (10506) > Select a bank account you wish to make payment > Fill out ‘Invoice Number’.
Bill payment creating form screen
3. Fill out all of your detail
4. Once you fill out all of the correct detail, and then click save.
4. Bill payment creating form page. Click ‘Save Bill Payment Form’ button.
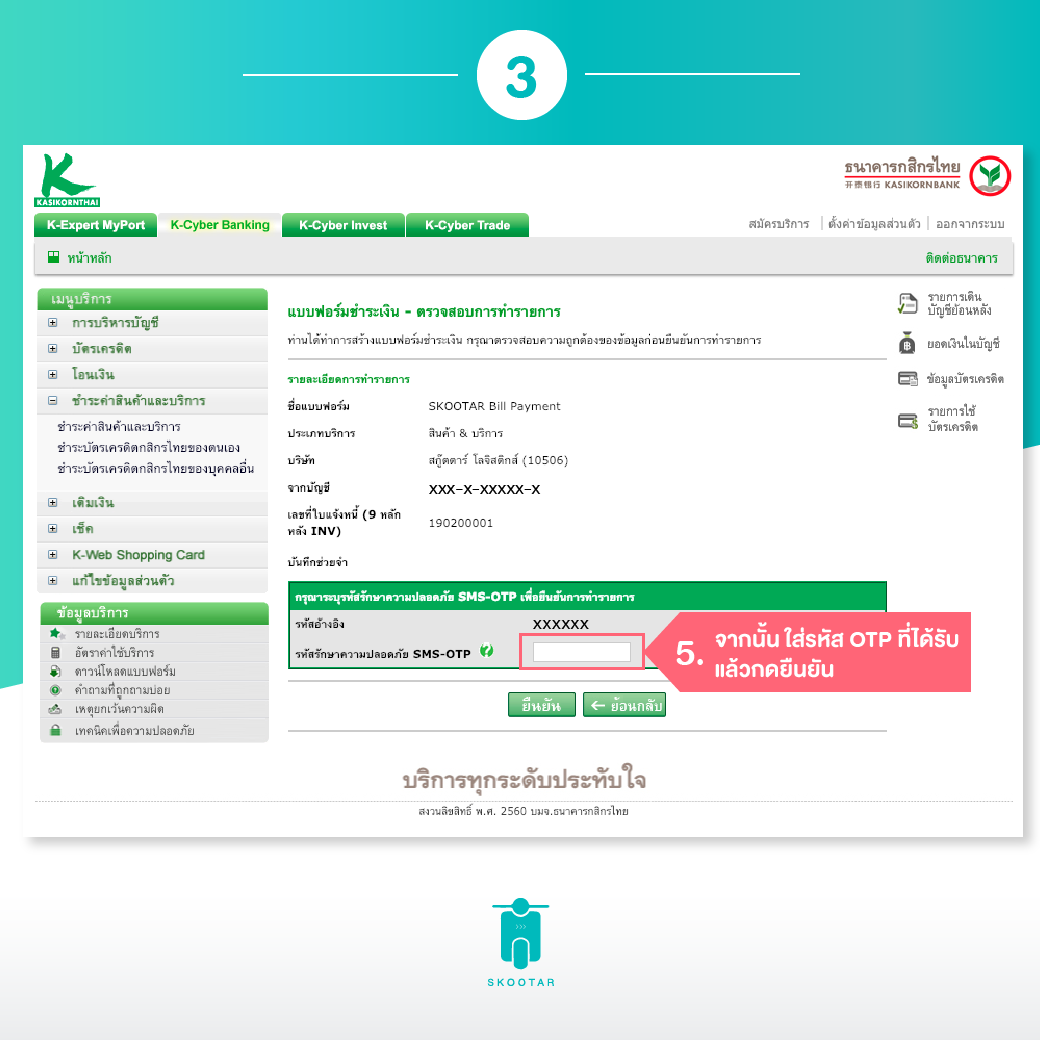
5. Bill payment form page – transaction checking. Enter OTP code from SMS, and then click ‘Confirm’ button.
Bill payment form page – transaction-checking screen
5. After that, enter OTP code from SMS, and then click ‘Confirm’ button.
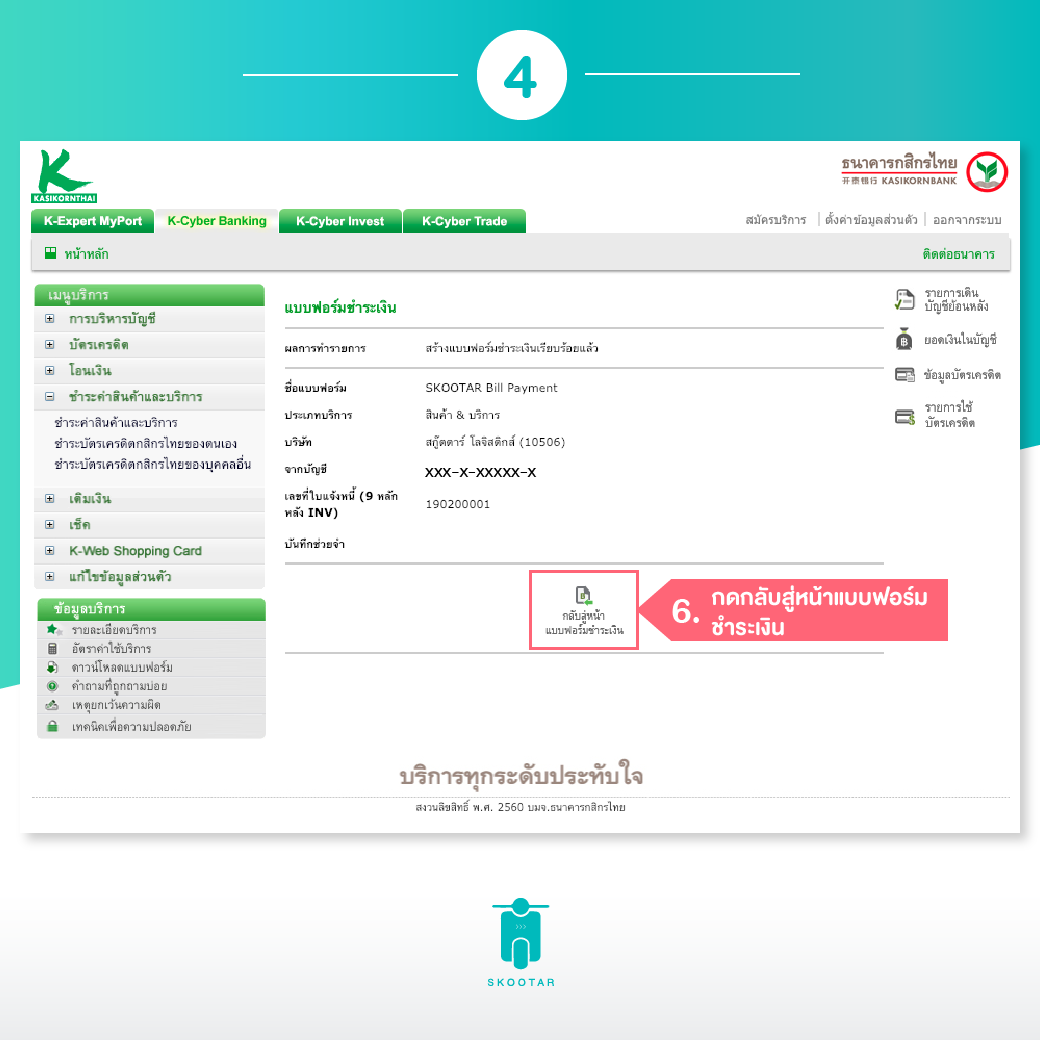
6. Complete bill payment form. Click ‘Go Back to Bill Payment Form’ button.
Complete bill payment form
6. Click ‘Go Back to Bill Payment Form’ button.
7. Product and service payment page. Click a form to make a bill payment.
Product and service payment screen
7. You will receive a list of bill payment form that was previously created.
SKOOTAR Would Like to Present a New Feature That Will Boost Convenience to All of Business and Employee Customers’ Work
That is the feature that includes group invoice and work monitoring as follows.
Group Invoice
Have you ever experience receiving several invoices when your company set ups so many accounts? This problem will completely go away with this group invoice feature. The company now can make their order from any accounts they have, but they will receive only one invoice.
For example, Mr. A, Mr. B & Mr. C work for a company called HAPPYCOMPANY and they all separately book an order via SKOOTAR app. As a result, there are 3 invoice bills turned up at the company in the end of the month. With the function of this group invoice feature, the HAPPYCOMPANY will therefore only receive 1 invoice bill from Mr. A, Mr. B & Mr. C altogether.
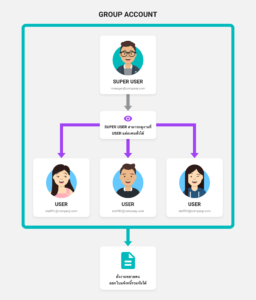
Work Monitoring
We categorize user rights into 2 levels, which are Super User Level and User Level. The super user level can look into all the number of orders from the level user.
For example, Mr. A, Mr. B & Mr. C work for a company called HAPPYCOMPANY and Mr. A is a boss of Mr. B & Mr. C. Now Mr. A wants to check orders of Mr. B & Mr. C., therefore this function comes to play as it can specify user rights which enable Mr. A to easily monitor and see the number of orders that Mr. B & Mr. C have made.
If you are interested in trying this feature, you can make a request by sending the following documents.
Phor Phor 20 and Company certificate.
E-mail addresses of users you wish to have in the group invoice.
For example:
staff01@company.com
staff02@company.com
staff01@company.com
Detail to issue an invoice consists of the following information.
– Name and address of the Company
– First name and last name of invoice contact
– E-mail address to issue the invoice
If you would like to use the work-monitoring feature, please kindly inform the following information.
– E-mail address you wish to rank as Super User Level
– E-mail address you wish to rank as User Level
Terms and Conditions of the Group Invoice Feature
The invoice that you receive will not specify detail of order that a user has made.
The invoice will be included in the billing cycle after the process of grouping invoice is finished.
E-mail addresses of users you wish to include in the group invoice feature must be already registered with SKOOTAR.
SKOOTAR will take about 5-7 days to install the group invoice feature for you.
For more information, please contact our sales team 02-105-4429.
**For only customers who opt payment method by cash, credit card or PromptPay.
Have you ever booked an order with SKOOTAR and every time you receive an invoice only under your name? Besides that, it can also be such chaos to issue a receipt under company name, despite you make an order via SKOOTAR with a company. Also, sometimes the company may change its address and you cannot edit the old address to the new one right away on your receipt.
It may seem like a small problem, but many companies may not allow you to withdraw money by not having the company’s name on the receipt. Besides that, when the company changed its address, the receipt may still be issued under the old address. That can usually be very time consuming to process.
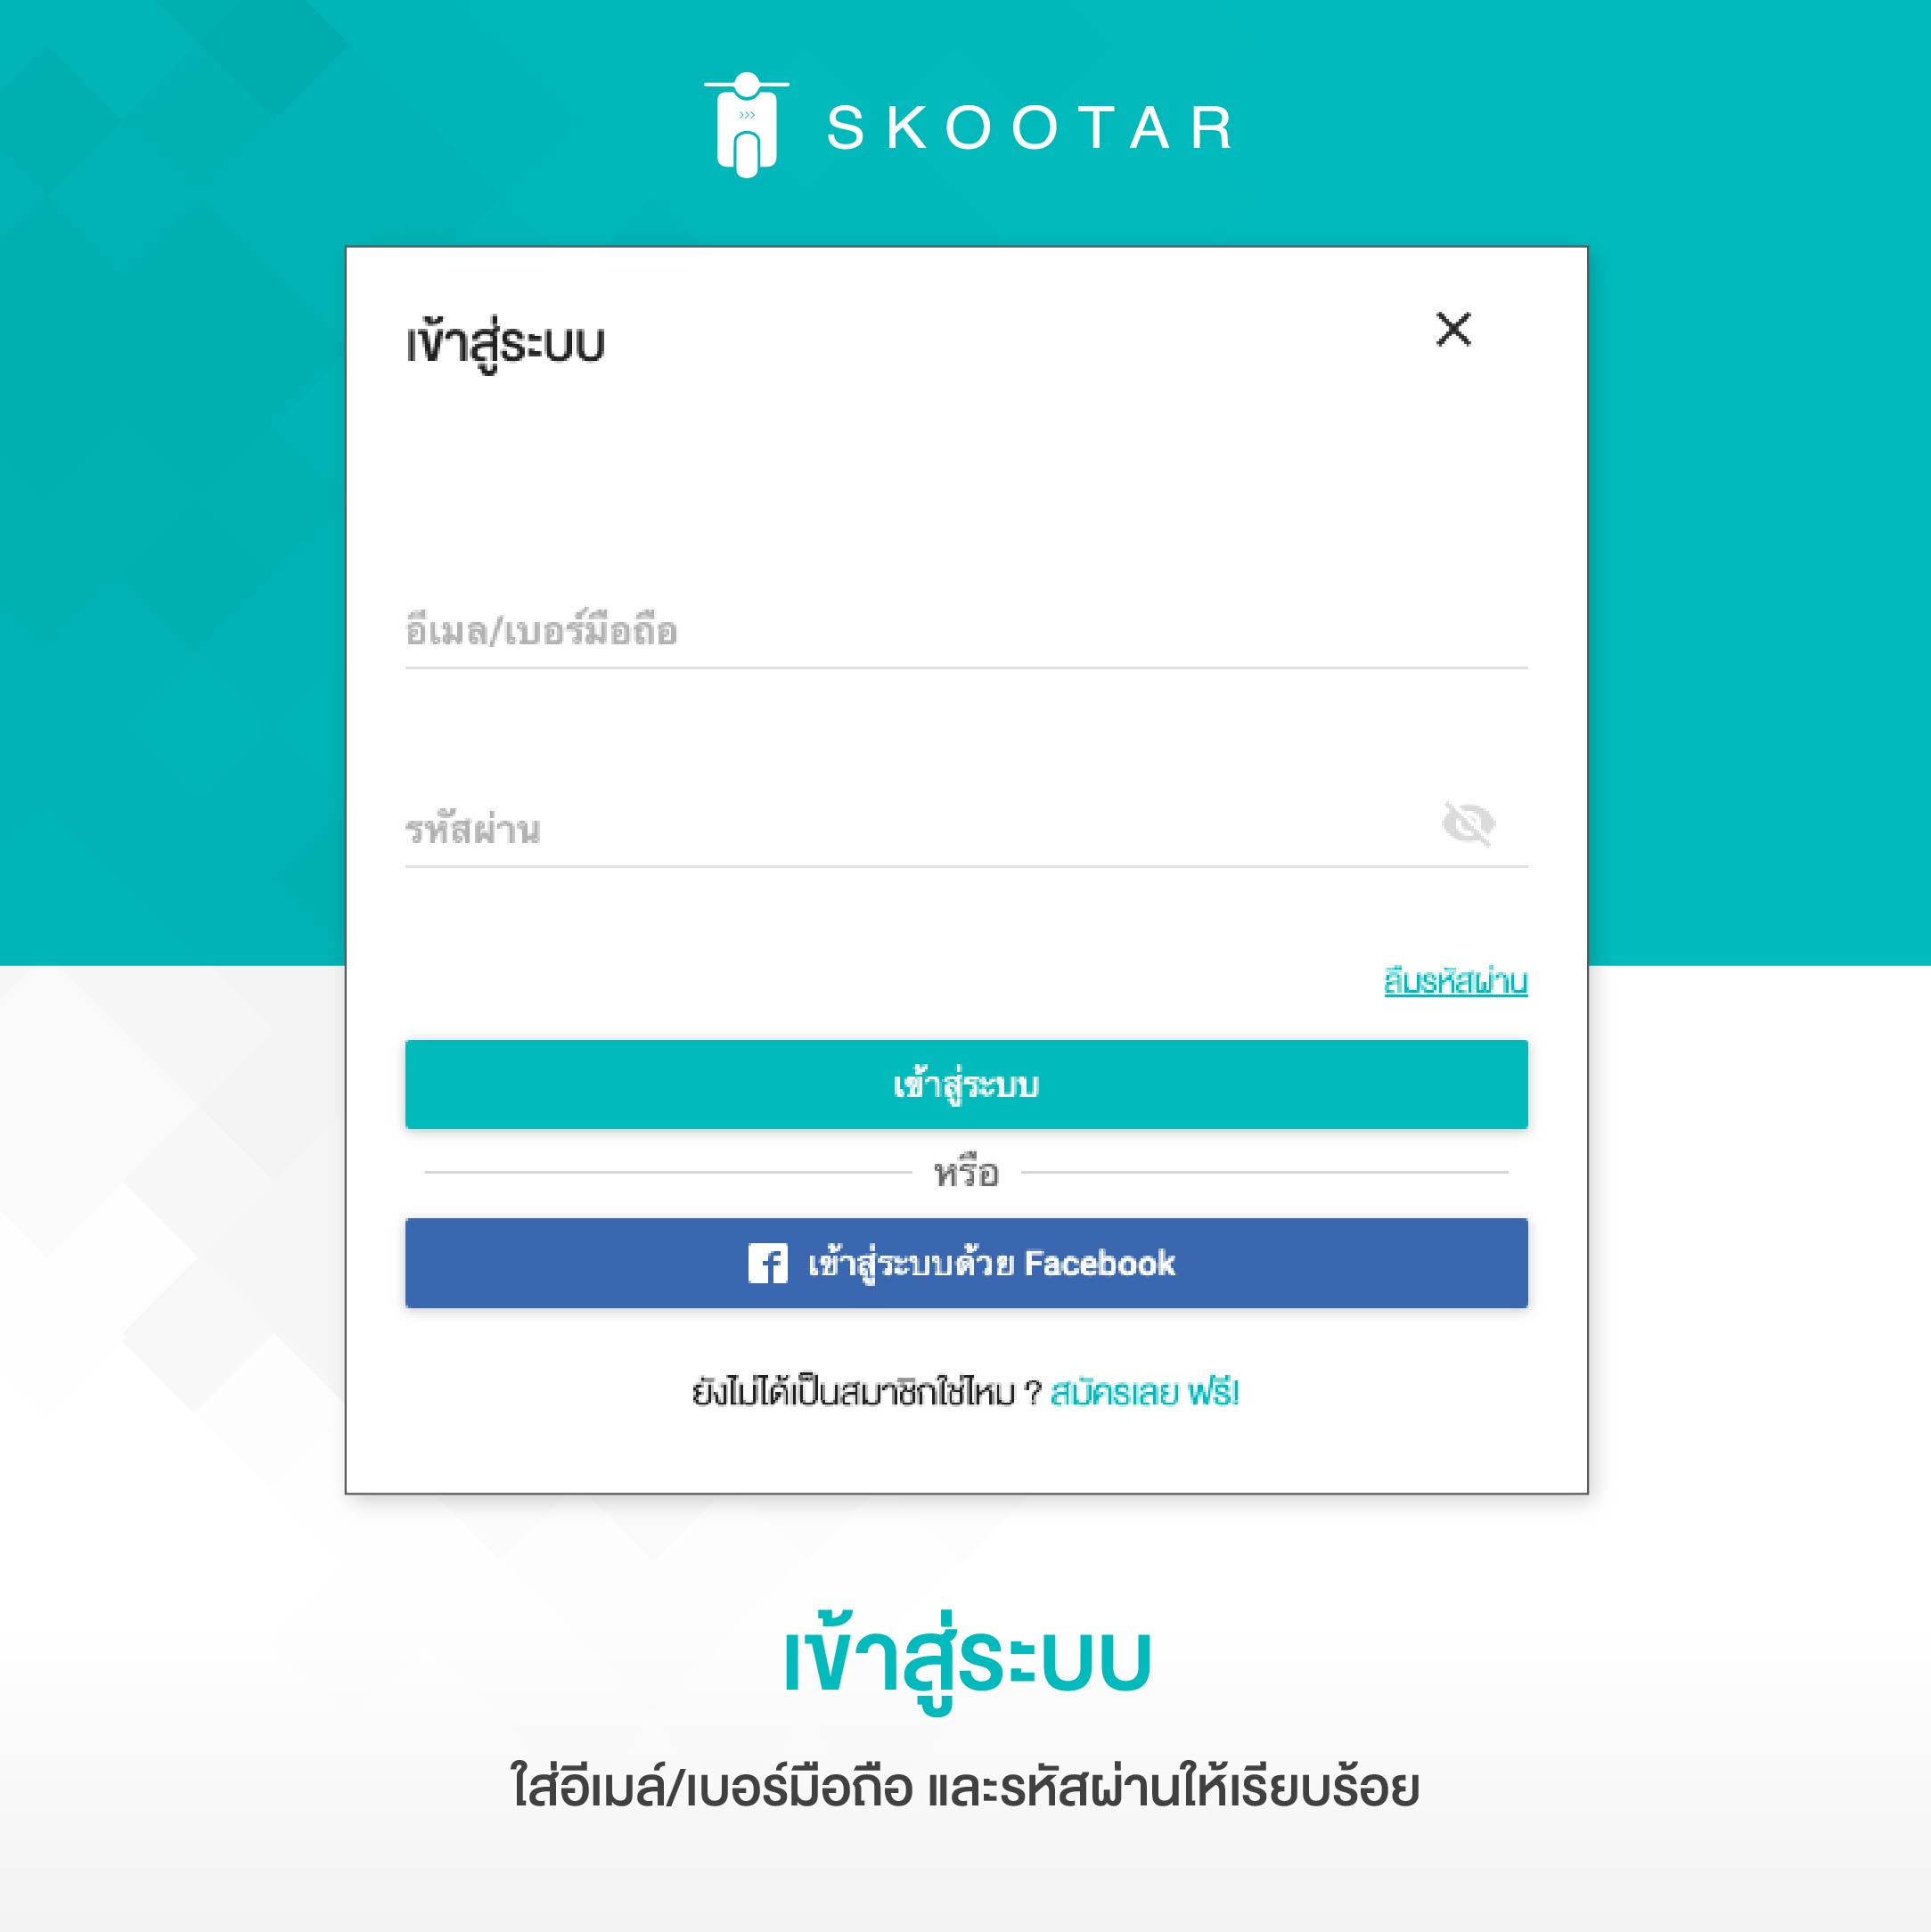
Today… all of these problems will be gone, once you get to experience with our new feature, ‘Issuing a Receipt Under a Company Name’ via our website or SKOOTAR app.
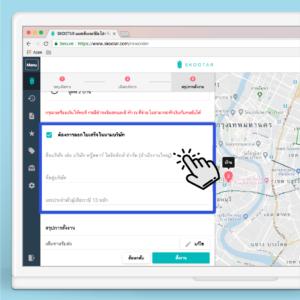
2 Steps on How to Use the Feature on the SKOOTAR Website
1. After you select your preferred type of payment, click ‘Issue a Receipt Under Company Name’ button. 2. Fill out your name, address and taxpayer identification number.
4 Steps on How to Use the Feature on the SKOOTAR App
1. Open SKOOTAR app, then choose your preferred location from starting point to ending point (up to 10 locations). You can have a messenger to go back to the starting point by selecting ‘Round Trip’.
2. Select your preferred category and service. You can add more detail in a note box regarding things you would like your messenger to know.
3. Enter a promo code (if any) and click ‘Now’ (in 45 minutes) in order to call a messenger to pick up your package right away or click ‘Later’ in order to book an order in advance.
4. On the screen of confirming an order, make sure all of the information is correct. After that, click ‘Issue a Receipt Under Company Name’, and then fill out all of the detail to confirm.
Just simple as this, now you can have a receipt issued under your company’s name. Now you do not have to deal all kinds of problems any more.
Term and Condition of Issue a Receipt Under a Company Name Feature
The feature can be used with payment method such as cash, credit card or PromptPay. The feature is not compatible with payment method such as invoice payment and SKOOTAR wallet.
If you had any questions, feel free to contact us at our call center 02 105 4429 during working hours.